Exam View Quizzes:
How to export an ExamView quiz and share via the school’s network
Please note that since the final quiz is posted to the school's network as opposed to the Internet, students must be at school to take this quiz. Although this is a downfall, the benefit is that it is very quick to create image-rich quizzes that provide students with immediate feedback.
Export your Quiz
1. Create your quiz in Exam View and save the file for future use and editing
2. Export your questions from Exam View by going to File > Export > HTML
3. Name your quiz > Read through your options and select either "study guide" or "test" (If you selected "test" you must add or verify your e-mail address) > OK
4. Select where you would like to save this exported copy of the quiz (I recommend saving it somewhere only you can access - then later, copy it to the Q:drive when you are ready to share it with students) > Title your file > Save
*You now have two versions of your quiz saved.
|
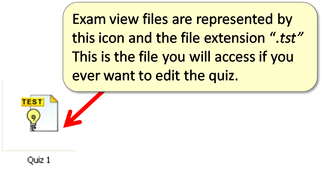
1. An editable quiz, which is your original Exam View file. If you wanted to change any questions on the quiz, you would need to go back to this original Exam View file, edit the questions and export again.
|
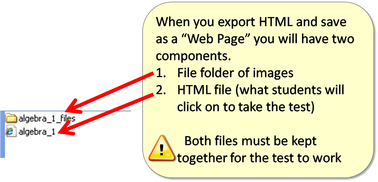
2. A non-editable HTML/Web Page with two components. This is what you will share with students.
|
Share Your Quiz with Students
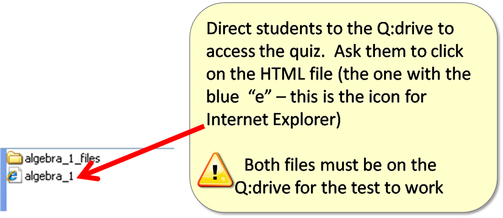
1. To share your quiz with students, post both components (file folder of images and HTML file) to the Q:drive
2. To access the test, students must go to your folder on the Q:drive and click on the HTML file (the one with the "e"
1. To share your quiz with students, post both components (file folder of images and HTML file) to the Q:drive
2. To access the test, students must go to your folder on the Q:drive and click on the HTML file (the one with the "e"